I just started this weekend, transferring my old home videos from some miniDV tapes to my PC. I have more than 50 hours of playtime on tapes from my old video camera that have been waiting for this moment, for an average of 15 years or so.
Better late than never, they say, and now I finally had some time to spare. I thought if I managed to do two tapes a day, each afternoon together with my coffee, it would take a month or so. The software I used back then for the transfer was ‘Kino‘. Tough luck, as I cannot find a working version of it any more, and it won’t compile easily, too many outdated dependencies. The loss is not big though, it would bring more overhead and delay to the process of transferring. My luck smiled at me then, as I thought of the command line tool ‘dvgrab‘ and it proved to be working just fine and quite easily too. Just give a command and the hole of the tape gets transferred on disk, with scenes separated the way they were filmed , as separate files, date and time shot reflected on filename.
The said command is:
dvgrab --autosplit --timestamp --size 0 /run/media/theo/INTENSO/dvgrab/vid-
There is the option ‘--rewind‘ that I used at first but I soon realized that the first file recorded had sound problems. That option should rewind the tape for you before starting any transfers. It seemed easier for me, just load a new tape, not minding if it was at the start or at the end, and summon the magic! Doing so, the first scenes in the first two tapes seemed OK but sounded badly on VLC player. ‘Totem’ seemed to play both correct audio and video, but I couldn’t risk it, I searched for a solution. I didn’t fiddle much as I realized that manually rewinding, starting and pausing the tape at the beginning and subsequently giving the command, saved the day. The above command fills my dvgrab folder on INTENSO disk with files starting with ‘vid-‘, something like ‘vid-2004.8.15_18-02-41’, neat eh? You should use your thing here if you have a similar task at hand.
Having solved the transfer to disk part, it was time to find a way to convert the DV format to something recognizable by my TV media player. I went for ‘Handbrake‘ as you can adjust everything as you desire with a GUI and the batch conversion happens afterwards easily for all files in a folder with the same settings. Or so I thought.
The weekend passed quickly like that, I managed to grab 6 tapes. Then came Monday. To my shame as an engineer, that was the first time that I did a test of several files with the media player of the TV. The files created with the batch process were not the same as the one I did at the beginning. The sound didn’t play, the codec was not recognized. The ‘mediainfo‘ app showed that AAC codec was used, not what I had chosen. And I had erased all the large DV files to save space!!! A thought of punishing myself by doing it all over, quickly went away. I would not accept re-converting again the converted files. It would take much time and the result would be worse.
Before I say what I finally did, let me show you my error so you know to avoid it. I made a new Handbrake preset and made it the default so each time I start the app, I could work with less fuss. But before saving the preset, on the ‘Audio’ tab I changed the codec here:
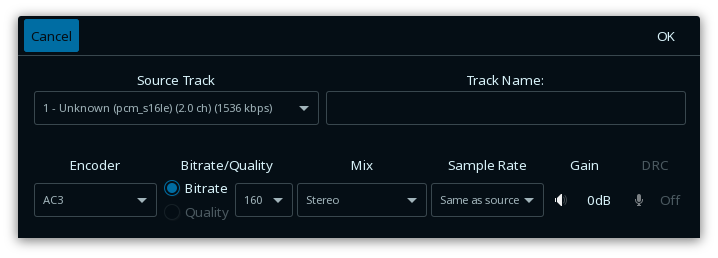
This didn’t save the changes in Audio, only the Video tab changes were saved. Instead I should press ‘Track Selection’ and make my changes there on the combo box together with the drop list.
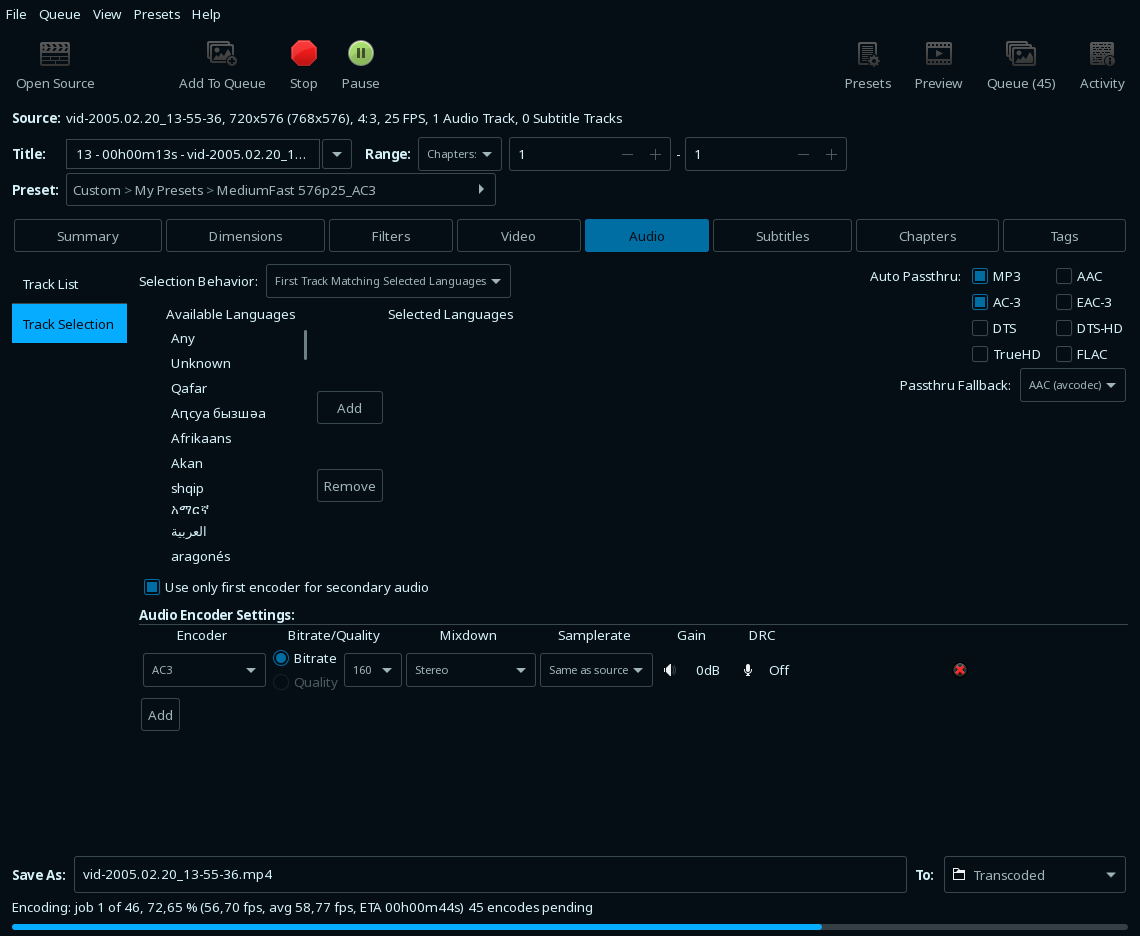
Only then my audio changes got saved in my preset. From now on everything worked as it should.
For the more than 100 videos with the wrong sound format, I used avidemux , but with some automation. Maybe this job could be done better with some other, GUI-less tool like ffmpeg, but I lacked the knowledge to convert only the audio and keep the video intact in order to save time. A thing I knew that avidemux could do. I had worked many-many times with it in the past. At this point I had no will to experiment.
It is possible to automate avidemux to do your binding in a batch, with a bash script. Firstly open a file and make the desired adjustments to the codecs used and the output container format multiplexer.

Then go to File>Project Script>Save As Project. This will save a python file. Edit it with your editor to erase all the lines that are specific to the loaded file. What remains should look like mine:
PY  <- Needed to identify
 --automatically built--
 adm = Avidemux()
 adm.setPostProc(3, 3, 0)
 adm.videoCodec("Copy")
 adm.audioClearTracks()
 adm.setSourceTrackLanguage(0,"und")
 adm.audioAddTrack(0)
 adm.audioCodec(0, "LavAC3", "bitrate=160");
 adm.audioSetDrc(0, 0)
 adm.audioSetShift(0, 0, 0)
 adm.setContainer("MP4", "muxerType=0", "optimize=1", "forceAspectRatio=False", "aspectRatio=1", "rotation=0", "clockfreq=0")
Saved it as ‘vid-set.py’. Then make the bash script:
#!/bin/bash

for FIL in `ls *mp4 | sort` ; do
  avidemux3_cli --load "$FIL" --run vid-set.py --save ${FIL%.*}-edited.mp4 --quit
done
Now save both files in the folder with the videos to edit. Run the script and avidemux runs your settings to all the files one by one. Done!
When all files were edited and I was relieved, I looked for a better solution. It seems that plain ffmpeg is a better choice. With a command like the one below, it should do the job faster without the intermediate python file creation through the GUI.
ffmpeg -i input.mp4 -c:v copy -c:a ac3 -b:a 160k /path/to/output.mp4
I didn’t test it, but it should work.
I hope I won’t give myself a reason to go through this again… I will continue grabbing videos carefree now…
Excuse me for the long post, it may not be an everyday problem that I solved, I just wanted to share my experience as I lived it. Hopefully you will learn to test better before long processes.
Have fun,
Theodore.